

Every year, thousands of glassware sets, mirrors, and electronics arrive broken simply because someone assumed that wrapping something in plastic automatically makes it safe. That assumption is exactly why understanding how to use bubble wrap correctly matters so much. Bubble wrap is one of the most effective cushioning materials available, but it only works when it’s applied with the right technique, the right thickness, and the right amount of coverage. If you’ve ever wondered how to use bubble wrap for fragile items without wasting material or leaving weak spots, this guide walks you through the entire process — from choosing the right roll to sealing the final layer before it goes into a box.
Whether you’re shipping ceramics to a customer, moving house, or gifting a crystal vase, the goal is always the same: zero movement, zero impact, zero breakage. Let’s unpack exactly how professional packers get this right every single time.
🎁 Why Bubble Wrap Is the Gold Standard for Fragile Item Protection
Bubble wrap has remained the go-to cushioning solution for decades because it does something few other materials do as efficiently — it absorbs shock through trapped air pockets while staying lightweight and flexible enough to mold around irregular shapes. When you use bubble wrap for fragile items like glassware, ceramics, or electronics, those tiny air bubbles compress on impact and distribute force evenly across the surface instead of letting it concentrate on one fragile point.
This is precisely why bubble wrap outperforms plain packing paper or newspaper for anything breakable. A vase wrapped only in paper might survive a gentle placement into a box, but it has almost no defense against a drop, a rough courier handoff, or a shift during transit. Bubble wrap, on the other hand, creates a buffer zone that keeps the item isolated from the walls of the box and from other contents shifting around it. That single difference is often what separates a smooth delivery from a damage claim.
📏 Choosing the Right Bubble Wrap for Your Items
Not all bubble wrap is created equal, and picking the wrong type is one of the most overlooked reasons fragile items still get damaged despite being “wrapped.” The bubble size, wrap thickness, and material grade all need to match what you’re protecting.
Small vs Large Bubble Wrap
Small bubble wrap, with bubbles around 3/8 inch, is ideal for delicate, detailed items like jewelry, small ceramics, or glass ornaments because it hugs contours tightly and leaves fewer gaps. Large bubble wrap, with bubbles closer to 1 inch, provides deeper cushioning and works better for heavier or bulkier fragile items such as lamps, large vases, or framed artwork where you need more shock absorption per layer.
Anti-Static and Heavy-Duty Variants
If you’re packing electronics — circuit boards, monitors, or sensitive devices — anti-static bubble wrap is non-negotiable, since regular plastic wrap can generate static charges that damage internal components. For heavier or sharper items, heavy-duty bubble wrap or air cushion wrap resists punctures far better than standard rolls. Sourcing a reliable bubble wrap supply that matches your item type is the first real step toward correct wrapping, and it’s worth keeping a mix of bubble wrap rolls and bubble wrap sheets on hand for different packing jobs.
🧠 The Correct Way to Use Bubble Wrap (Step-by-Step)
This is the part most people get wrong, and it’s exactly what separates amateur packing from professional-grade protection. Following the correct wrapping technique consistently is what actually prevents breakage — not just the presence of bubble wrap itself.
Step 1: Prep Your Workspace and Supplies
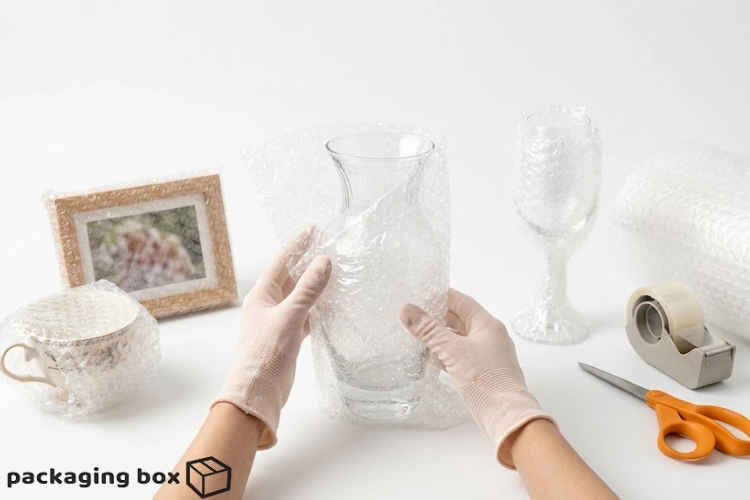
Before you touch the item, lay out everything you’ll need: bubble wrap, packing tape, scissors, and a clean flat surface. Having your packaging tape and cushioning material ready before you start prevents rushed, sloppy wrapping halfway through the job.
Step 2: Should the Bubble Side Face In or Out?
This is one of the most common questions people ask, and the answer depends on the item. For most fragile items, the bubble side should face inward, toward the object, because the bubbles make direct contact with the surface and absorb shock right at the point of impact. The flat side faces outward so it can be taped smoothly without the tape catching on bubbles and losing its seal. The only exception is glass with delicate painted or finished surfaces, where a thin flat-side-in layer first prevents any surface marking before adding a bubble-side-in outer layer.
Step 3: Layering Technique for Maximum Protection
A single layer of bubble wrap is rarely enough for genuinely fragile items. As a general rule, thin items like glasses or ornaments need at least two layers, while heavier or more delicate pieces like mirrors, crystal, or electronics benefit from three layers or more. Wrap the item, rotate it, and wrap again at a slightly different angle so the second layer covers any gaps left by the first. This layering technique also naturally reinforces corners and edges, which are the most vulnerable points on almost every fragile object.
Step 4: Sealing Edges and Securing Loose Ends
Once wrapped, secure the bubble wrap with tape at the seams, not directly on the item itself. Tuck in loose ends so nothing unravels during transit, and add a strip of tape at both ends of the wrap to lock it in place. A properly secured wrap should hold its shape even if you gently shake the item — if it shifts or loosens, add another wrap of tape around the middle.
🍷 How to Bubble Wrap Specific Fragile Items (Practical Examples)
Different items demand slightly different approaches, and understanding these variations is what turns generic wrapping advice into genuinely effective protection.
Glassware, Ceramics & China Dishes
When learning how to bubble wrap glassware, start by wrapping each piece individually rather than grouping several together. Wrap glasses and cups from the base upward, giving extra attention to rims and handles since these thin areas crack first. For china dishes, place a layer of bubble wrap between each plate before stacking them vertically in the box, never flat, since vertical stacking distributes weight more evenly and resists cracking under pressure.
Mirrors & Picture Frames
Mirrors need corner protectors in addition to bubble wrap, since the corners are both the sharpest and most breakage-prone points. Wrap the entire mirror in at least two layers, add cardboard corner guards, and place it inside a box with minimal wiggle room, using foam wrap or packing paper to fill any remaining gaps.
Electronics
For electronics, always use anti-static bubble wrap as the first layer, followed by a standard layer for additional shock absorption. Avoid taping bubble wrap directly onto ports, screens, or buttons, and instead wrap loosely enough to protect without pressing into delicate components.
Vases, Crystal Items & Antiques
Crystal items and antiques often have uneven shapes, so wrapping technique matters more here than almost anywhere else. Wrap narrow necks and protruding handles separately with small bubble wrap before wrapping the entire body, then secure everything together with a final outer layer. This two-stage approach prevents the thinnest, most delicate sections from being under-protected while the bulkier body gets adequate cushioning.
📦 Bubble Wrap + Box Packing: Building a Damage-Proof Package
Bubble wrap alone isn’t the finish line — how you build the surrounding package matters just as much. Once your item is wrapped, it needs to sit inside a box with zero room to shift, because even perfectly wrapped items can crack if they’re free to slide and collide with the box walls during transit.
Start by lining the bottom of the box with a layer of packing peanuts, crumpled packing paper, or foam wrap to create a cushioned base. Place your wrapped item in the center, then fill every remaining gap with void fill material until nothing moves when you gently shake the closed box. This box filling technique is what most people skip, and it’s often the real reason fragile items break even after careful wrapping. For anything genuinely heavy or oddly shaped, pairing your cushioning with a sturdy shipping box makes a measurable difference, and choosing the right container is covered in more detail in this guide on how to strengthen corrugated boxes for heavy items.
Here’s a quick reference table for how much wrapping and cushioning different fragile items typically need:
| Item Type | Recommended Bubble Wrap Layers | Additional Cushioning Needed |
|---|---|---|
| Drinking glasses / cups | 2–3 layers | Packing paper around rims |
| China dishes / plates | 2 layers between each piece | Vertical stacking in box |
| Mirrors / picture frames | 2–3 layers + corner guards | Foam wrap in box gaps |
| Electronics | 1 anti-static + 1 standard layer | Void fill material |
| Vases / crystal / antiques | 3 layers (neck wrapped separately) | Packing peanuts around base |
This table isn’t a rigid rulebook — heavier or oddly shaped items may need an extra layer — but it gives you a reliable starting point so you’re not under-wrapping items that genuinely need more protection.
🚚 Bubble Wrap Tips for Moving and Shipping Fragile Items
The stakes go up considerably when fragile items are traveling long distances, whether through a courier network or during a home move. Bubble wrap for moving needs to be more generous than for short-distance handling, simply because the item passes through more hands, more vehicles, and more temperature and pressure changes along the way.
When preparing for a move, group similarly fragile items together in the same moving boxes rather than mixing them with heavier household goods that could crush them from above. Label every box with a visible fragile marking, since fragile stickers genuinely do influence how carefully handlers treat a parcel. If you’re shipping through a courier service, it’s worth reviewing this comparison of corrugated boxes vs regular boxes for online shipping to understand which box strength actually holds up during transit protection, especially for e-commerce packaging where your product changes hands multiple times before reaching the customer. For sellers building a repeatable packing process, this complete e-commerce packaging guide breaks down how to combine bubble wrap with the right box size and sealing method for consistent, damage-free deliveries.
If you’re sourcing packaging materials in bulk for a business, browsing a dedicated packaging materials category can save both time and cost compared to buying supplies piecemeal, and it’s a smart move whether you’re running a small online store or managing frequent home relocations.
⚠️ Common Bubble Wrap Mistakes to Avoid
Even with good intentions, a few recurring mistakes quietly undermine otherwise careful packing efforts:
- Using a single thin layer for genuinely fragile or heavy items instead of layering properly
- Taping bubble wrap directly onto the item’s surface, which can leave residue or pressure marks
- Leaving empty space in the box instead of filling gaps with void fill or packing peanuts
- Wrapping multiple items together instead of individually, allowing them to knock against each other
- Ignoring corners and edges, which are statistically the most common breakage points
Avoiding these five habits alone resolves the majority of damage complaints reported during shipping and moving.
❓ Frequently Asked Questions
How many layers of bubble wrap do I need? Most fragile items need at least two layers, while heavier or more delicate pieces like mirrors, crystal, or electronics benefit from three layers for adequate shock absorption.
Should the bubble side face in or out? The bubble side should generally face inward toward the item, since the bubbles make direct contact and absorb impact right at the surface, while the flat side faces outward for smooth taping.
How do I wrap glass with bubble wrap? Wrap glass items individually from base to rim using at least two layers, giving extra attention to thin or protruding areas like handles and necks before securing with tape at the seams.
How much bubble wrap do I need for shipping? As a rule of thumb, plan for enough bubble wrap to wrap each item two to three times over, plus extra for lining the box base and filling any remaining gaps.
How do I bubble wrap electronics safely? Use anti-static bubble wrap as the first layer to prevent static damage, followed by a standard layer for cushioning, while avoiding direct pressure on ports, screens, or buttons.
🎯 Final Thoughts: Wrap Smart, Ship Safe
Learning how to use bubble wrap correctly isn’t complicated once you understand the logic behind it — proper layer count, correct bubble orientation, secure sealing, and a well-filled box working together as one system rather than isolated steps. The difference between a fragile item arriving intact and arriving in pieces almost always comes down to these small, deliberate choices rather than luck.
Whether you’re packing a single vase for a friend or building a repeatable process for shipping breakable products to customers across Pakistan, the techniques in this guide give you a dependable framework to work from every time. Explore our full range of bubble wrap and packaging materials to get properly equipped for your next fragile packing job — because the right materials, used the right way, are what actually keep your items safe.











💬 0 Comments
Leave a Comment