
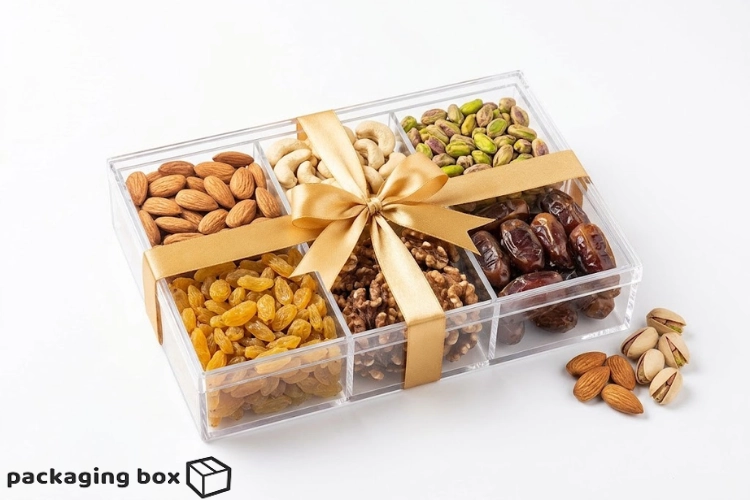

Knowing how to arrange dry fruits in an acrylic box can turn an ordinary pack of nuts into a gift people remember. The same almonds, cashews and pistachios look very different when they are tossed in loosely and when they are arranged with care. Acrylic is transparent, so every detail shows. Neat rows, balanced colors and clean compartments make a box look premium. A messy layout makes it look careless.
This guide covers the full process. You will learn how to choose the right acrylic dry fruit box, prepare your ingredients, and fill each compartment. You will also learn how to finish with ribbons, labels and garnish. The tips work for home gifting, small businesses, and festive orders like Eid, Diwali and weddings. Let’s start with why presentation matters.
🌟 Why Dry Fruit Presentation Matters More Than You Think
People judge a gift before they taste it. With dry fruit gift box arrangement, the first look sets the value in the receiver’s mind. A well-arranged box feels thoughtful and worth the price. A poorly arranged one feels like a last-minute purchase, even when the dry fruits are top quality.
Acrylic raises the stakes. Cardboard hides what is inside. An acrylic box shows everything. That is great for shelf appeal and visual appeal, but it leaves no room for sloppy work. Gaps, broken pieces, uneven heights and mixed-up colors are all visible from the front.
Presentation also affects how people use the gift. A well-arranged box feels too nice to dump into a bowl. It sits on a table, gets photographed, and gets shared with guests. For businesses, that means free word-of-mouth marketing.
📦 Step 1: Choose the Right Acrylic Box for Your Dry Fruits
Your arrangement starts with the box. The shape, size and number of compartments decide which layouts are possible. An acrylic box for dry fruits with six sections suits a variety gift. A single large bowl suits one hero ingredient.
If you are comparing styles, this breakdown of acrylic box vs crystal bowl for dry fruit gifting explains the trade-offs in detail. For retail sellers, the comparison of a straight acrylic box vs round acrylic bowl shows which format tends to attract more buyers.
Here is a quick guide to matching box type with purpose:
| Box Type | Best For | Arrangement Style |
|---|---|---|
| Straight acrylic box | Single or two-variety gifts | Layered or side-by-side blocks |
| Multi-compartment tray | Variety gifting, hampers | One dry fruit per section |
| Round acrylic tray | Festive tables, weddings | Circular or radial pattern |
| Crystal bowl | Premium single-ingredient gifts | Mounded center with garnish |
| Heart-shaped box | Valentine’s, anniversaries | Mixed center with edge border |
This table helps you decide before you buy. Match the box to the gift’s story, and half the arrangement work is done.
If you want ready-made options, the acrylic dry fruit collection is a good starting point. You can also browse the full acrylic box category for more shapes and sizes.
Match Capacity to Portion Size
Size matters more than most people expect. A box that is too big leaves empty gaps and the dry fruits slide around. A box that is too small forces overfilling and the lid will not close properly. A straight acrylic box (500gm) suits a compact single-variety gift. A six-portion acrylic box (750gm) works well for a mixed gift with three to six varieties.
🧼 Step 2: Prepare Your Dry Fruits and Your Box
Before you arrange anything, get the basics right. This step protects hygiene and freshness, and it makes the arrangement look better.
Start with the box. Wash it with mild soap and lukewarm water, then dry it fully with a lint-free cloth. Any water droplets inside will cloud the acrylic and can make dry fruits soft. Use a food-grade acrylic box so nothing leaches into the food, and wipe the lid so there are no fingerprints.
Next, sort the dry fruits. Go through each variety and pick the best pieces. Remove broken almonds, cracked pistachio shells and shriveled raisins. Choose fresh and crunchy dry fruits of similar size within each variety. Uniform size is what makes a layout look neat and professional.
Wear food-safe gloves while you work. Fingerprints and oils on nuts are not appealing, and gloves keep the whole process hygienic. Lay everything out on a clean tray before you start filling.
🎯 Step 3: How Do You Arrange Dry Fruits in a Box? A Step-by-Step Method
This is the core of the process. The method below works for most boxes, whether you are making one gift or fifty.
Place Larger Pieces First
Always place larger pieces first. Walnut halves, whole dates and big cashews form the structure of the box. Put them at the back of compartments or in the center of a bowl. Smaller items like raisins, pistachios and almonds then fill around them and cover gaps.
This approach also keeps heavy items from crushing delicate ones. Dates and walnuts are sturdy. Pistachios and slivered nuts are lighter, so they go on top.
Arrange in Compartments and Fill Evenly
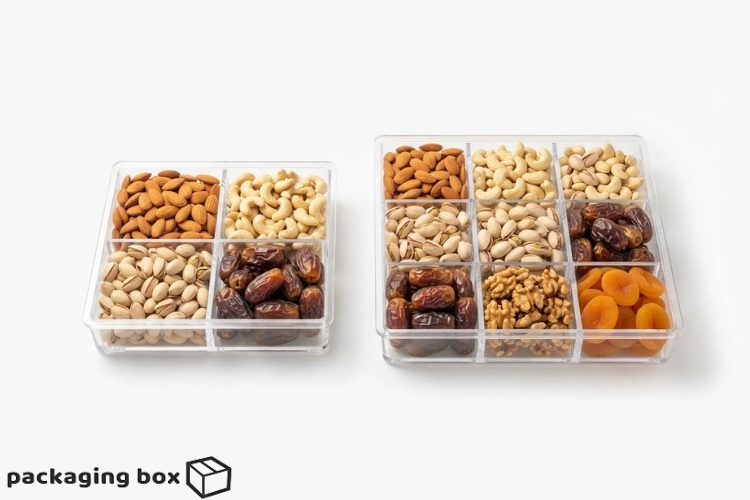
If your box has dividers, arrange in compartments with one variety per section. Do not mix varieties in the same compartment unless it is a deliberate mixed-nut section. Fill evenly so every compartment looks equally full. A half-empty compartment next to an overflowing one looks unbalanced right away.
A good rule is to fill each section to about 90 percent, then level the top with your fingertips. The lid should close without pressing on the contents. If you are using a multi-portion acrylic tray, the dividers already do the structural work. Your job is to match the fill height across sections.
Use a Divider When the Box Has Open Space
For a straight or round box with no sections, use a divider. You can cut a thin strip of clear acrylic, use a decorative paper strip, or use a small row of whole dates as a natural border. Dividers stop varieties from sliding together during transport. They also give the box a designed look.
Keep the Layout Symmetrical
Keep the layout symmetrical. The human eye likes balance. If you place dates on the left, put an equally weighted item on the right. For round trays, arrange varieties in a clock pattern, with the heaviest colors opposite each other. A neat and symmetrical layout signals care and quality, and it photographs well for social media.
Finish With a Garnish
Finish with a garnish. This is the last visual touch. Place a few whole almonds on top of a cashew section. Add three or four green pistachios over a golden raisin compartment. Scatter a pinch of dried rose petals for festive boxes. Garnish should be small and deliberate. Too much will hide the dry fruits underneath.
🎨 Step 4: Use Color Balance for Visual Appeal
Color is the biggest factor in how attractive a box looks. Dry fruits come in a narrow range of browns, golds and greens, so deliberate placement matters. This is where dry fruit color contrast comes in.
The idea is to never place two similar colors side by side. Brown almonds next to brown dates look flat. Place golden cashews between them and the box comes alive. Green pistachios add a fresh pop that stands out against warm tones.
Here is a simple pairing guide:
| Dry Fruit | Color | Best Neighbor |
|---|---|---|
| Almonds | Warm brown | Cashews or raisins |
| Cashews | Cream gold | Dates or pistachios |
| Pistachios | Green | Almonds or golden raisins |
| Walnuts | Tan brown | Pistachios or cashews |
| Raisins | Golden or dark | Almonds or walnuts |
| Dates | Deep brown | Cashews or pistachios |
Use this as a starting point. The goal is color balance: a mix of warm and cool tones, light and dark, with a green accent. If you are building a six-section box, a classic order is almonds, cashews, pistachios, walnuts, raisins and dates. Alternate light and dark across the rows.
🧩 Step 5: Pick a Layout That Suits Your Box Shape
Different boxes need different layouts. A layout that works in a tray will fail in a bowl.
Layouts for Multi-Compartment Trays
With a divided acrylic tray or acrylic compartment box, the layout is simple: one variety per section, matched fill levels, and alternating colors. A 5-portion round acrylic tray works well with a center compartment for the hero variety, such as premium pistachios or jumbo cashews. The outer four sections hold supporting items.
For bigger gifting, the 11-portion acrylic round tray offers a statement look. Place the most colorful items in the center. Keep the outer ring in alternating tones.
Layouts for Straight Boxes and Bowls
For a straight box, use the layering technique. Start with a base of larger pieces like walnuts, add a middle layer of almonds, and finish with a top layer of pistachios and cashews. Through clear walls, the layers show as colored stripes, which looks striking.
For a crystal bowl, build a gentle mound with a small peak in the center. Place the most attractive pieces on the outside, where they are visible through the glass. A crystal bowl (500gm) is ideal for a mixed-nut presentation with a premium feel.
Layouts for Heart and Specialty Shapes
A heart-shaped acrylic box suits romantic gifting. Fill the center with mixed nuts. Then trace the heart’s edge with a border of whole almonds or dates. The outline reinforces the shape.
🎀 Step 6: Decorate the Dry Fruit Box for Gifting
Once the arrangement is done, decoration turns it into a finished gift. If you are wondering how to decorate a dry fruit box for gifting, the answer is to keep it simple and consistent.
Add a ribbon or label. A satin ribbon in gold, maroon or emerald green suits dry fruit boxes well. Tie it around the lid in a clean bow, or wrap it across and tuck the ends underneath. Add a small tag with the dry fruit names, the occasion or the sender’s name. The ribbon should match the dominant color theme, not compete with it.
Beyond ribbons, a few gift wrapping ideas work well with acrylic:
- A sheer organza wrap over the lid for a soft, elegant look
- A thin band of printed paper around the box with a greeting
- Dried flowers or a small cinnamon stick tucked under the ribbon
- A sleeve in matte black or gold for a luxury feel
If you want a more traditional alternative to acrylic, compare it with tin box vs cardboard box for gifting. Some gift sets pair an acrylic tray with a gold tin box as an outer case.
Keep the decoration proportional. The dry fruits are the star. Ribbons, tags and garnish should frame them, not hide them. This balance is a core idea in packaging aesthetics and gift hamper styling.
🎁 Step 7: Adapt Your Presentation for Eid, Diwali and Weddings
The occasion changes the mood of the box. Here is how to adjust the same method for each one.
Eid Gifting
Eid gifting leans toward warmth, tradition and generosity. Use gold and green ribbons, include dates and pistachios prominently, and consider adding a small card with Eid greetings. For ideas, see this guide on Eid dry fruit hamper packaging. For broader religious gifting, the religious gift box packaging guide covers Eid, Hajj and Ramadan.
Diwali Gifting
For Diwali, brighter colors work well. Use orange, deep red and gold accents. Add a small diya motif on the label or a sprinkle of dried marigold petals. Variety is important here, so a multi-compartment tray with five or six dry fruits feels generous and festive.
Wedding Gifting
Wedding boxes are about elegance and consistency. Because you will often make many identical boxes, plan a repeatable layout and stick to it. Soft colors like ivory, blush and gold suit weddings well. For more detail, read the wedding dry fruit box decoration guide.
Corporate and Seasonal Gifting
Corporate boxes need a clean, professional look. Use minimal decoration, a branded label and a restrained color palette. The corporate gift dry fruit packaging tips cover this in depth. For national days, the dry fruit and chocolate hamper ideas show how to combine two product types in one box.
🔒 How to Keep Dry Fruits Fresh in an Acrylic Box
Beautiful arrangement means little if the dry fruits go stale. Freshness is part of hygiene and freshness, and it affects how the gift is received.
Acrylic boxes are not fully airtight by default, so choose a dry fruit box with a lid that closes snugly. If the box will sit for several days, place it in a cool, dry spot away from direct sunlight. Heat and light speed up oil oxidation in nuts, which causes a bitter or stale taste.
For longer storage or shipping, consider air-tight packaging as an extra layer. A food-safe sealing film, a snug outer sleeve or a resealable pouch inside the box all help. If you are comparing barrier options, the kraft pouch vs aluminum pouch shelf life comparison offers useful insight into how materials affect freshness.
Avoid packing dry fruits when they are warm or humid. Let freshly roasted nuts cool completely before they go into the box. Moisture trapped in a closed container is the fastest route to soft, sticky dry fruits.
🏷️ Branding and Customization for Sellers
If you sell dry fruit gift boxes, branding and customization can lift your product above the competition. A custom dry fruit box with your logo, a printed sleeve or a branded sticker builds trust and recognition.
Keep branding simple. A small logo sticker on the lid, a printed ribbon or a branded card inside is enough. The goal is to stay memorable without hiding the dry fruits. Consistent branding across all your boxes makes your products recognizable on shelves and in photos.
Selling in volume? It helps to know the costs in advance. The bulk packaging orders guide explains minimum quantities and pricing factors. For help picking the right shape for your range, browse the acrylic gift trays.
⚠️ Common Mistakes to Avoid
Even experienced gift makers slip up. These are the mistakes that most often spoil a good arrangement:
- Overfilling the box so the lid bulges or will not close
- Mixing broken and whole pieces in the same section
- Placing similar colors next to each other
- Using wet or damp boxes that cloud the acrylic
- Adding too much decoration that hides the dry fruits
- Leaving gaps that let contents slide in transit
Fixing these mistakes takes minutes, but the difference in the final look is large.
✅ Quick Presentation Checklist
Before you close the lid, run through this short check. It takes under a minute and catches most problems.
- Is the box clean, dry and free of fingerprints?
- Are all dry fruits whole, fresh and similar in size?
- Are larger pieces placed first and smaller ones on top?
- Are the compartments filled evenly with a symmetrical layout?
- Does the color balance feel varied and lively?
- Is there a neat garnish and a ribbon or label?
If every answer is yes, your box is ready to gift or sell.
🌟 Final Thoughts: Make Every Box Feel Like a Gift
Learning how to arrange dry fruits in an acrylic box comes down to a few repeatable habits. Choose the right box. Prepare clean, fresh ingredients. Place larger pieces first, fill evenly, balance the colors, and finish with a thoughtful garnish and ribbon. These dry fruits presentation tips are simple, but together they turn a plain pack of nuts into a premium edible gift presentation.
Start with one box, practice the layout, and adjust to your style. Once you have a layout you love, repeat it. Consistency is what makes a gift or a brand memorable.
Ready to build your own? Explore the acrylic dry fruit collection at Packaging Box and pick the box that fits your gift. For bulk or custom orders, visit the shop and get your packaging sorted today.
❓ Frequently Asked Questions (FAQs)
How do you arrange dry fruits in a box?
Start with a clean, dry box. Place larger pieces like walnuts and dates first. Then fill around them with smaller items like almonds and pistachios. Fill each section evenly, keep the layout symmetrical, and finish with a small garnish. Alternate colors so no two similar tones sit side by side.
How to make a dry fruit gift box look attractive?
Use color contrast, a neat symmetrical layout and uniform dry fruit sizes. Add a satin ribbon, a small label and a light garnish. Keep decoration minimal so the dry fruits remain the focus.
Which dry fruits look best in an acrylic box?
Almonds, cashews, pistachios, walnuts, raisins and dates all work well. Pistachios add a green accent. Cashews and golden raisins add light tones. Dates and almonds give depth. A mix of these gives the best visual balance.
How to keep dry fruits fresh in an acrylic box?
Use a clean, dry box with a snug lid. Let roasted nuts cool before packing. Store the box in a cool, dry place away from sunlight. For longer storage, add a sealing film or an inner pouch for extra air-tight protection.
What is the best layout for a dry fruit gift box?
For compartment trays, use one variety per section with alternating colors. For straight boxes, use layers. For bowls, build a gentle mound with the most attractive pieces on the outside. Choose the layout that fits your box shape.
How to decorate a dry fruit box for gifting?
Tie a ribbon around the lid, add a small tag or label and place a light garnish on top. You can also add organza wrap, a printed band or dried flowers. Keep it simple so the dry fruits stay visible.




💬 0 Comments
Leave a Comment